
📌 Table of Contents
Pattern Overview & Sizing
The Willow Raffia Bag is an artistic, bohemian summer tote handcrafted by connecting circular raffia chain loops with natural wooden beads. Rather than traditional tubular crochet, this unique design builds a structured openwork canvas that joins into a rectangular tote bag.
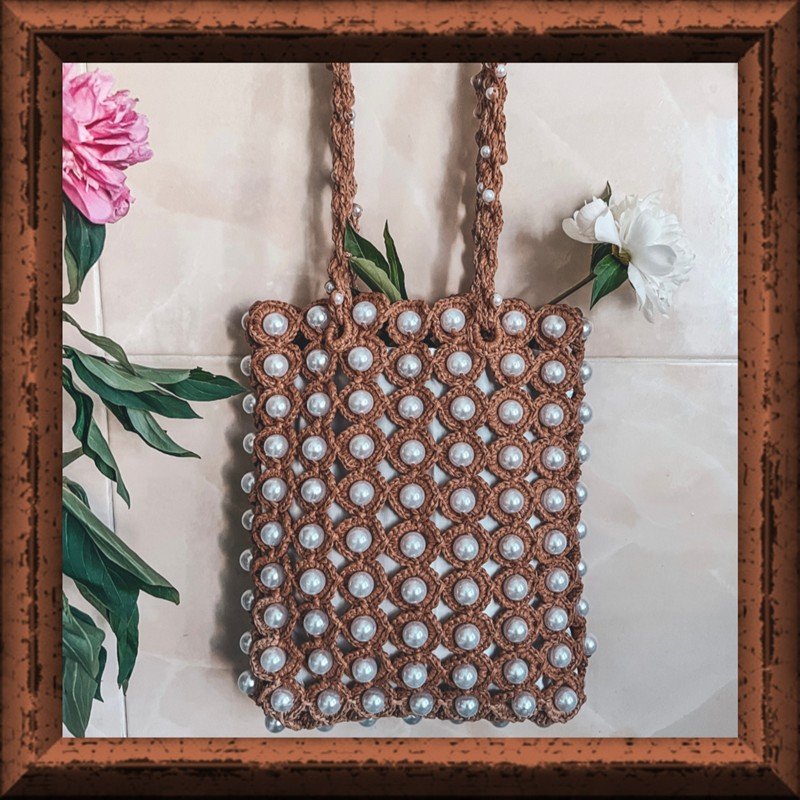
- Finished Dimensions: Length: 10 inches (25 cm) | Width: 1 1/8 inches (3 cm) | Height: 16 inches (40 cm).
- Handle Length: 21 1/8 inches (54 cm).
- Skill Level: Intermediate.
- Raffia Tip: No need to steam or pre-straighten raffia yarn before crocheting this model.
Materials & Tools Needed
- Raffia Yarn: Approx. 380 yards (350 meters) of quality raffia (e.g., Ispie Raffia in Autumn / Natural shade).
- Crochet Hooks: 2.5 mm (main hook for body) and 2.0 mm (for slipping beads).
- Wooden Beads:
- 167 wooden beads (Diameter: 16 mm, hole diameter: 2.5 mm).
- 50 wooden beads (Diameter: 8 mm, hole diameter: 2.0 mm for handles).
- Notions: Sharp scissors, plastic tapestry needle with large eyelet, craft/PVA glue, and iron for steam finishing.
Abbreviations & Gauge
- CH: Chain Stitch
- SC: Single Crochet
- SlSt: Slip Stitch
- Gauge: 16 stitches and 16 rows = 4×4 inches (10×10 cm) in SC with 2.5 mm hook.
Step 1: Crocheting the Beaded Canvas (Rows 1–32)
The main body canvas measures 16 × 10 beads. Work with the 2.5 mm hook:
- Row 1: Crochet 13 CH, join in circle with SlSt. Put on a 16 mm bead, insert hook into the 7th loop of the circle, crochet 1 SC together with the bead. Next 10 SC (=11 sts total). *Crochet 13 CH, join in circle with SlSt, put on bead, insert hook into 7th loop of circle, 1 SC with bead, next 10 SC; repeat from * across until you have 10 beads in the row.
- Row 2: Crochet along the opposite side: (11 SC, SlSt) × 9 times, then 6 SC.
- Row 3: Crochet 13 CH, join with SlSt, put on bead, insert hook in 7th loop, 1 SC with bead, next 5 SC (=6 sts). *Crochet 13 CH, join with SlSt, put on bead, insert hook in 7th loop, 1 SC with bead, next 4 SC. Insert hook into the 6th loop of the circle from previous row, crochet 1 SC together, 5 SC (=11 sts); repeat from * to end of row.
- Row 4: Crochet to the other side: (11 SC, SlSt) × 9 times, next 6 SC.
- Rows 5–31: Repeat the pair of 3rd and 4th rows alternately until 31 rows are completed.
- Steam Blocking: Lightly steam the canvas on the wrong side with an iron through a damp pressing cloth. (Do not press hard on wooden beads).
- Row 32 (Closing the Cylinder): Bend the edges of the canvas together. Crochet 5 SC, insert hook into the 6th loop of the circle from Row 1, crochet 1 SC together, 5 SC (=11 sts), SlSt. Repeat across to close the body cylinder into a loop. Do not cut thread.
Step 2: Crocheting the Bag Bottom
Crochet the bottom strip in the exact same manner as Rows 1–2 of the main canvas. The bottom consists of a row of 7 beads:
- Work the chain circles with bead insertions for 7 beads, then crochet back along opposite side.
- Cut thread, pull out end, weave securely through the 1st SC to the wrong side, tie knot, secure with a touch of glue, and steam lightly through a damp cloth.
Step 3: Base & Bottom Assembly
- Align the base of the bag cylinder with the 7-bead bottom piece.
- Insert hook into the 6th loop of the circle of the 1st row of the bottom, crochet 1 SC together, 5 SC, SlSt.
- Continue joining across: 5 SC, insert hook in 6th loop of next circle of bottom, 1 SC together, 5 SC (=11 sts), SlSt.
- At the corner: turn piece, 5 SC, bend bottom 90°, insert hook into 6th loop of last bottom circle, 1 SC together, 5 SC (=11 sts), SlSt.
- Join remaining edges, turn bag inside out, fasten off all yarn ends with glue, and weave in neatly.
Step 4: Twisted Spiral Beaded Handles (*2)
Craft two sturdy, high-end twisted cord handles with small 8 mm beads:
- Using 2.5 mm hook, crochet a single continuous chain 5 meters (approx. 5.5 yards) long.
- Slip 25 small 8 mm beads onto the chain at random intervals (approx. 5 beads per meter). Switch to the 2.0 mm hook whenever sliding a bead onto the chain.
- Join chain ends into a circle, tie securely, and fix with glue.
- Twisting Technique: Hook one end to a stationary anchor. Straighten the long chain loop and twist tightly into a spiral. Fold in half so it twists onto itself. Fold in half a second time and twist once more into a dense 4-ply rope handle.
- Attachment Rings: Crochet 10 CH, pull through the looped end of the handle, join in circle with SlSt, and work 16 SC around. Repeat on both ends of both handles.
- Sewing Handles: Count 2 beads from the left and right outer edges. Using plastic needle and raffia, sew the handle rings firmly between the 1st and 2nd top rows of beads using strong backstitches.
Step 5: Sewing the Lining & Final Steaming
- Cut an inner fabric lining matching the dimensions of the bag (approx. 25 × 40 cm).
- Insert lining inside the bag, pin edges flush with top inner rim, and hand-sew with invisible slip stitches.
- Give the entire tote a final light steam pressing through a damp cloth to set the raffia stitches. Your boutique-quality Willow Raffia Bag is complete!
Explore More Free Bag Patterns