
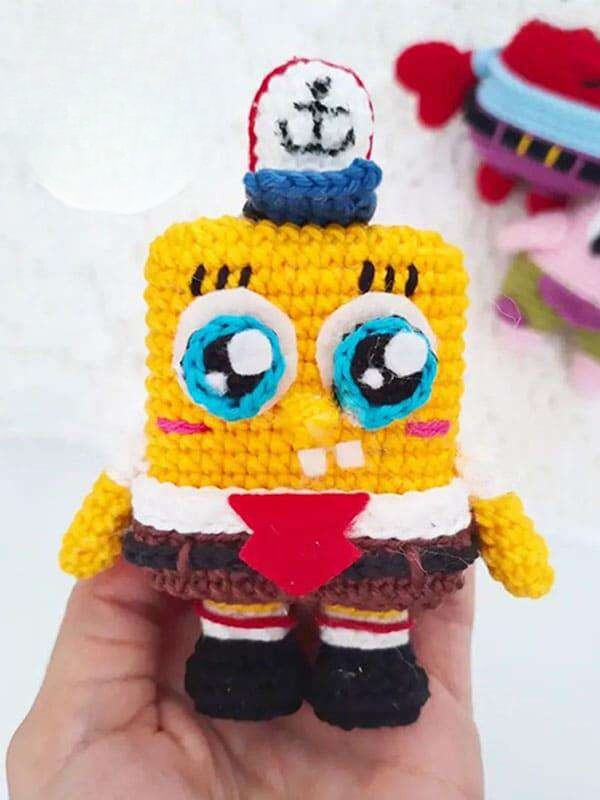
Are ya ready, kids? Who lives in a pineapple under the sea? SpongeBob SquarePants! Bring Nickelodeon’s most iconic character to life with this detailed free amigurumi crochet pattern. Featuring his classic rectangular body, signature brown pants with red tie, cute shoes, and sailor hat!
| Finished Size | ~15 cm tall (6 inches) |
| Difficulty Level | Easy / Intermediate Fan Art |
| Terminology | US Crochet Terms |
- Yarn (Cotton or Acrylic Sport Weight):
- Bright Yellow – Body, nose & arms
- Brown – Square pants
- White – Blouse shirt, socks & hat
- Black – Shoes, belt & hat rim
- Turquoise / Blue – Eyes & hat brim
- Crochet Hook: 2.0 mm hook (or 2.5mm for plush yarn).
- Felt & Details: White felt (for eyes & teeth), Red felt (for necktie), Acetate / Cardboard insert (for sharp rectangular body structure).
- Notions: Polyester Fiberfill stuffing, yarn needle, glue / fabric adhesive, and scissors.
| Abbreviation | Stitch Meaning |
|---|---|
| MR / ch | Magic Ring / Chain |
| sc / sl st | Single Crochet / Slip Stitch |
| inc / dec | Increase (2 sc in 1 st) / Decrease (sc 2 together) |
| Tinc | Triple Increase (3 single crochets in 1 stitch) |
| BLO / FLO | Back Loop Only / Front Loop Only |
Use Yellow yarn and 2.0mm hook. Stuff gradually while keeping rectangular corners sharp!
- Rnd 1: Ch 8, starting in 2nd ch from hook: 1 inc, 5 sc, Tinc (3 sc in last ch), turn to work down other side: 6 sc (16)
- Rnd 2: 1 sc, Tinc, 5 sc, Tinc, 1 sc, Tinc, 5 sc, Tinc (24)
- Rnd 3: 2 sc, Tinc, 7 sc, Tinc, 3 sc, Tinc, 7 sc, Tinc, 1 sc (32)
- Rnd 4: 3 sc, Tinc, 9 sc, Tinc, 5 sc, Tinc, 9 sc, Tinc, 2 sc (40)
- Rnds 5-14 (10 rounds): 40 sc (40)
Fasten off. Tip: Cut a thin rectangle of acetate plastic or cardboard and glue inside the sides to help maintain SpongeBob’s signature crisp box shape!
Pants (Brown Yarn):
- Rnd 1: Ch 9, starting in 2nd ch from hook: 1 inc, 6 sc, Tinc, 7 sc (18)
- Rnd 2: 1 sc, Tinc, 6 sc, Tinc, 1 sc, Tinc, 6 sc, Tinc (26)
- Rnd 3: 2 sc, Tinc, 8 sc, Tinc, 3 sc, Tinc, 8 sc, Tinc, 1 sc (34)
- Rnd 4: 3 sc, Tinc, 10 sc, Tinc, 5 sc, Tinc, 10 sc, Tinc, 2 sc (42)
- Rnds 5-7 (3 rounds): 42 sc (42)
Blouse Shirt (Switch to White Yarn):
- Rnd 8: Work through BLO: 42 sl st (42)
- Rnd 9: Work through BLO: 42 sc (42)
Fasten off. Glue the stuffed yellow body piece inside the pants + blouse piece!
Legs & Shoes (Make 2):
- Start with Black (shoes): Rnd 1: 8 sc in MR (8). Rnd 2: 8 inc (16). Rnd 3: BLO 16 sc. Rnd 4: 16 sc. Rnd 5: 2 sc, 3 dec, 3 sc, dec, 3 sc (12).
- Switch to White (socks): Rnd 6: BLO 12 sl st. Rnd 7: BLO 12 sc. Embroider red & blue sock stripes.
- Switch to Yellow (legs): Rnd 8: BLO 12 sl st. Rnd 9: BLO 12 sc. Fasten off and glue under body.
Arms (Make 2):
- Start with Yellow: Rnd 1: 7 sc in MR. Rnds 2-5: 7 sc.
- Switch to White (sleeves): Rnd 6: BLO 7 sl st. Rnd 7: BLO 7 sc. Fasten off and glue to sides of body.
Use White yarn.
- Rnd 1: 6 sc in MR (6)
- Rnd 2: 6 inc (12)
- Rnd 3: (3 sc, inc) * 3 (15)
- Rnds 4-6 (3 rounds): 15 sc (15)
- Switch to Black (band): Rnds 7-8: BLO 15 sl st (15)
- Switch to Blue (brim): Rnd 9: 5 sc in FLO (5). Ch 1, turn. Rnd 10: 5 sc. Ch 1, turn. Rnd 11: 5 sc. Fasten off.
Embroider or paint the red anchor logo on the front of the hat and glue to the top of SpongeBob’s head!
- Eyes: Cut 2 circles of white felt (~2cm diameter). Crochet pupils with Black yarn (8 sc in MR) and Turquoise yarn (8 sl st BLO). Glue felt circles and pupils to face. Embroider 3 eyelashes over each eye!
- Teeth & Nose: Cut 2 white felt square teeth (~0.4cm wide). Nose: In Yellow, Ch 4, starting in 2nd ch: 3 sl st, ch 1, turn, 3 sl st BLO. Sew/glue between eyes.
- Tie & Belt: Cut a small red felt necktie and white collar triangles. Belt: Ch 49 in thin Black yarn, glue around pants, and embroider brown square belt loops.
- Acetate / Cardboard Core: Inserting flat acetate plastic strips inside the yellow body and brown pants before stuffing is key to keeping SpongeBob’s corners sharp and rectangular!
- Felt Detailing: Using crisp felt for the eyes, teeth, and red necktie gives the amigurumi a clean cartoon-accurate appearance.
- Face Alignment: Glue the eyes touching centered in the upper half, with the nose sticking out right between them and the teeth just below!
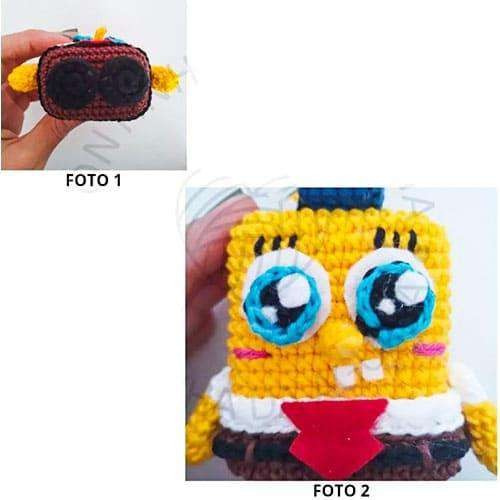
Hooray! Your handmade SpongeBob SquarePants Amigurumi is ready to bring joy from Bikini Bottom right into your home!
Who is your favorite character from Bikini Bottom? Would you like Patrick Star next? Share your photos and leave a comment below! Happy crocheting!